Cookie Monster Cupcakes
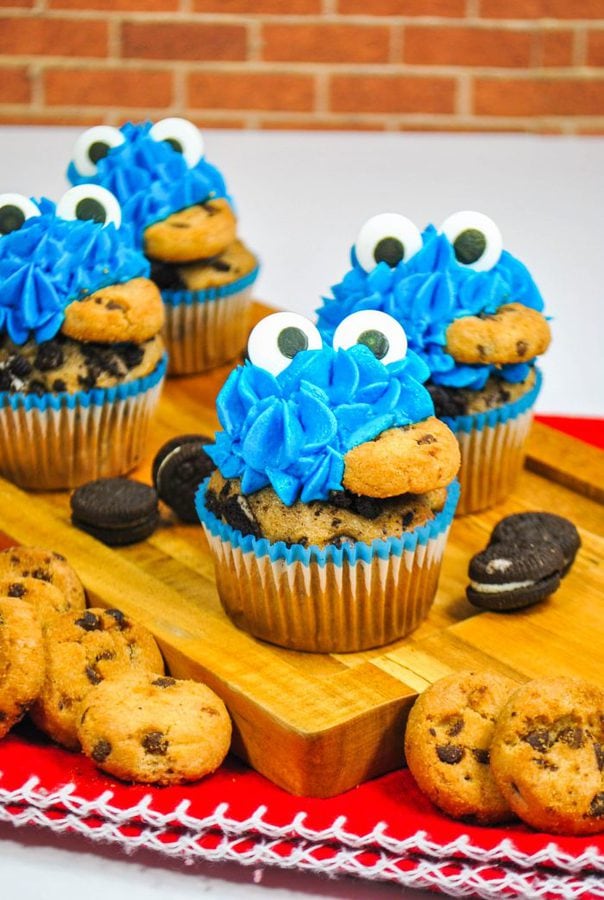
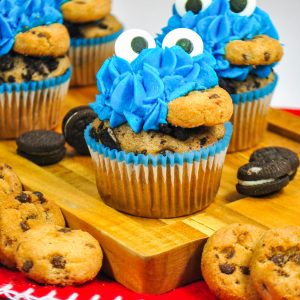
My moist Cookie Monster cupcakes feature moist Oreo cake and fluffy vanilla buttercream. They are easy to make and loved by all ages!
Serve with Cookie Monster Ice Cream or Cookie Monster cookies for the ultimate Sesame Street party.

These Cookie Monster Cupcakes Are the Perfect Way to Show Your Inner Child Some Love
Have a Cookie Monster fan in your life? You've got to make these cookie monster cupcakes! They're also great for birthday parties, and school events. ALMOST too cute to eat! Just like my Minion and Mermaid Cupcakes, these are super fun to make with kids! These Sesame street cupcakes are perfect for birthday parties too!
Ingredient Notes and Shopping Tips

- Flour: Measure flour by spooning it into a measuring cup and leveling it off with a knife.
- Do not dip your cup into the flour; you may accidentally overmeasure.
- Baking Powder: Replace every 6-12 months even if still technically in date per the package. This will ensure they will rise as much as possible.
- Milk: I always use whole milk for the moistest cake.
- Canola Oil: You could also use vegetable oil here.
- Crushed Oreos: I crushed mine in a plastic baggie with a rolling pin, so they still had a little texture to them. We don't want to be a fine power. You can also use a food processor if you have one.
- Royal Blue Gel Food Coloring: This will give you a more vibrant color than liquid food dye.
- Edible Eyes: If you can't find edible eyes, you can use another candy such as M&Ms or Skittles.
Use Unsalted Butter
I like to use unsalted butter so I can control the amount of salt in the recipe. Different brands of salted butter may have more or less salt than others.
How To Make Cookie Monster Cupcakes
For the Cupcakes

- Prep Work: Preheat oven and line pan with paper liners.
- Cream Butter: Combine butter and sugar. Add in eggs, oil ,and vanilla.
- Dry Ingredients: In a large bowl, whisk flour, salt, and baking powder together. Alternate wet and dry ingredients until just combined.
- Fold in chocolate chips and crushed Oreos.
- Bake: Fill liners and bake for about 21 minutes.
For the Frosting
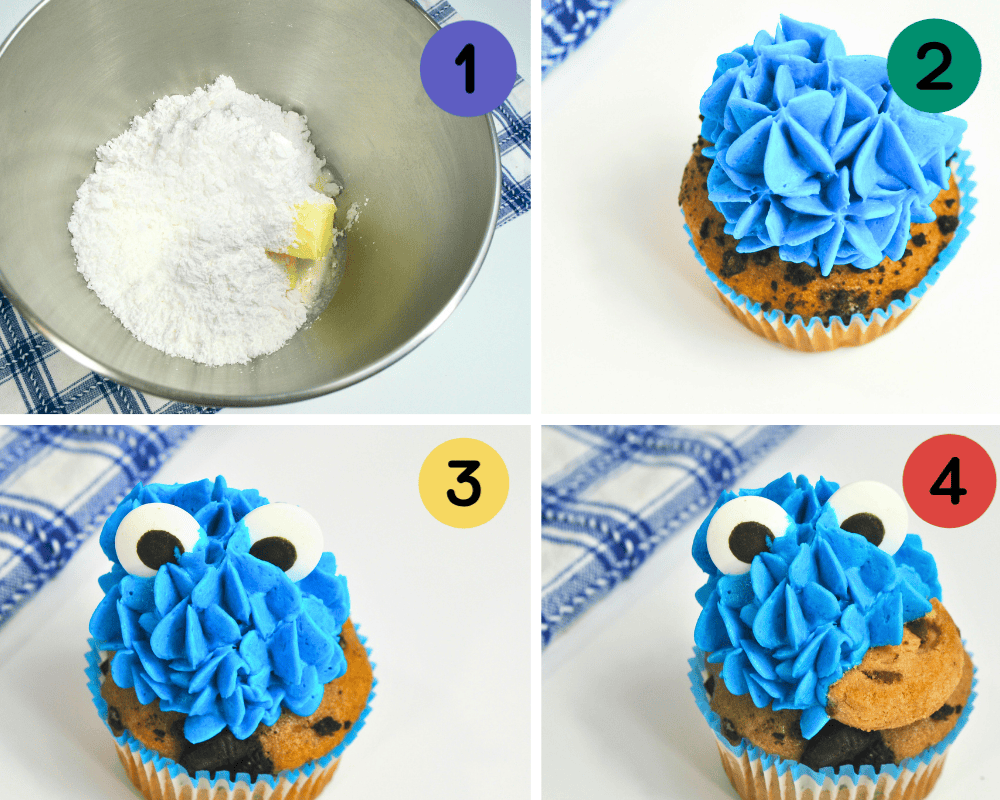
- Cream butter, and add vanilla. Add powdered sugar a little at a time until just combined. Add heavy cream as needed.
- Add blue food coloring until you reach your desired shade.
- Pipe or spread onto cupcakes. Add edible eyes, and a cookie.
️Tips️
- Use room-temperature ingredients to help everything come together smoothly.
- Do Not Overmix: Mix until just combined. This is when the flour just disappears. Overmixing leads to a tough, dense cupcake.
- How To Tell When They're Done: Cupcakes are done when a toothpick inserted near the center comes out clean or with just a few crumbs. They will also spring back lightly when touched. Avoid overbaking, which can lead to a dry cake.
Fill Liners Only ¾ of the Way Full
The cupcakes will rise when baked.
Yes, follow the instructions in my cookie monster cake post.
More Fun Cupcakes


📖 Recipe
Cookie Monster Cupcakes
Want to Save This Recipe?
Enter your email & I'll send it to your inbox. Plus, get great new recipes from me every week!
Ingredients
For the Cupcakes
- ⅓ Cup Unsalted Butter Softened (About 5 Tablespoons)
- 1 Cup White Sugar
- 1 Egg
- 2 Cups Flour
- ½ Teaspoon Salt
- 2 ½ Teaspoon Baking Powder
- ¾ Cup Whole Milk
- 1 Teaspoon Vanilla Extract
- 3 Tablespoons Canola Oil
- 1 Cup Mini Chocolate Chips
- ½ Cup Oreos Crushed About 8 Cookies
For the Buttercream
- 1 Cup Unsalted Butter softened
- 2 ½ Cup Powder Sugar
- 1 Teaspoon Vanilla
- 3 Tablespoons Heavy Cream
- Royal Blue Gel Food Dye
- Edible Eyes
- 6 Mini Chocolate Chip Cookies Halved
Instructions
- Preheat oven to 350 degrees F. Line a cupcake pan with paper liners.
- In a large bowl, cream butter, sugar, and vanilla until light and fluffy. Add egg and oil.
- In a large bowl whisk flour, salt and baking powder together.
- Gradually add flour mixture and milk until just combined. Do not over mix.
- Fold in chocolate chips and crushed oreos.
- Fill cupcake liners about ¾ of the way full. Bake for 21-23 minutes or until a toothpick inserted in the center comes out clean.
For the Frosting
- In a large bowl, cream butter and vanilla. Add powdered sugar a little at a time. Add heavy cream as needed until you reach your desired consistency.
- Add a few drops of blue food coloring until you reach your desired shade.
- Pipe or spread onto cooled cupcakes. I used a small star tip.
- Add 2 edible eyes, and a chocolate chip cookie for decoration.
Notes
-
- Flour: Measure flour by spooning it into a measuring cup and leveling it off with a knife.Do not dip your cup into the flour; you may accidentally overmeasure.
- Milk: I always use whole milk for the moistest cake.
- Canola Oil: You could also use vegetable oil here.
- Crushed Oreos: I crushed mine in a plastic baggie with a rolling pin, so they still had a little texture to them.
- Use room-temperature ingredients to help everything come together smoothly.
- Do Not Overmix: Mix until just combined. This is when the flour just disappears. Overmixing leads to a tough, dense cupcake.
- Fill Liners Only ¾ of the Way Full: The cupcakes will rise when baked.
- How To Tell When They're Done: Cupcakes are done when a toothpick inserted near the center comes out clean or with just a few crumbs. They will also spring back lightly when touched. Avoid overbaking, which can lead to a dry cake.
Nutrition

These are so much fun, for both kids and adults, and they taste delicious too! Fantastic work!
This recipe was so fun! I did this with my daughter and she loved these cookie monster cupcakes!
These Cookie Monster cupcakes are a hit! The moist Oreo cake and fluffy vanilla buttercream are delicious, and they’re so easy to make.
Aww, such a cute way to serve cupcakes! Just for fun, I served them as dessert at a family gathering and everyone loved them. Even the grown-ups. The buttercream frosting should have it's own fan club!
These adorable cupcakes were a huge hit with my grandkids. Great recipe!
These cupcakes are too stinkin' adorable! I made a batch for my young nephew and he was thrilled!
This is so good!! And so fun to make!!
These came out so adorable! And they were crazy delicious too. Thank you!